
TL;DR
Moving your rig into a closet and applying targeted acoustic treatment drastically reduces noise and reflections. Proper placement, sealing gaps, and ventilation are key to creating a quiet, functional space that won’t overheat or sound boxy.
Ever wonder if you can turn a tiny closet into a professional vocal booth or quiet workspace? The answer is yes — but only if you understand the real game: controlling how sound travels and managing heat. Moving your rig into a closet isn’t just about hiding noise; it’s about smart placement, effective dampening, and keeping your gear cool. When done right, it’s a game-changer for anyone working from home or with limited space.
This guide cuts through the clutter and shows you how to use acoustic treatment, strategic placement, and ventilation to make your closet setup not just quiet but genuinely functional. Whether you want perfect voice recordings or just a quieter work environment, these tips will help you build a space that balances soundproofing with practical airflow.
Acoustic dampening
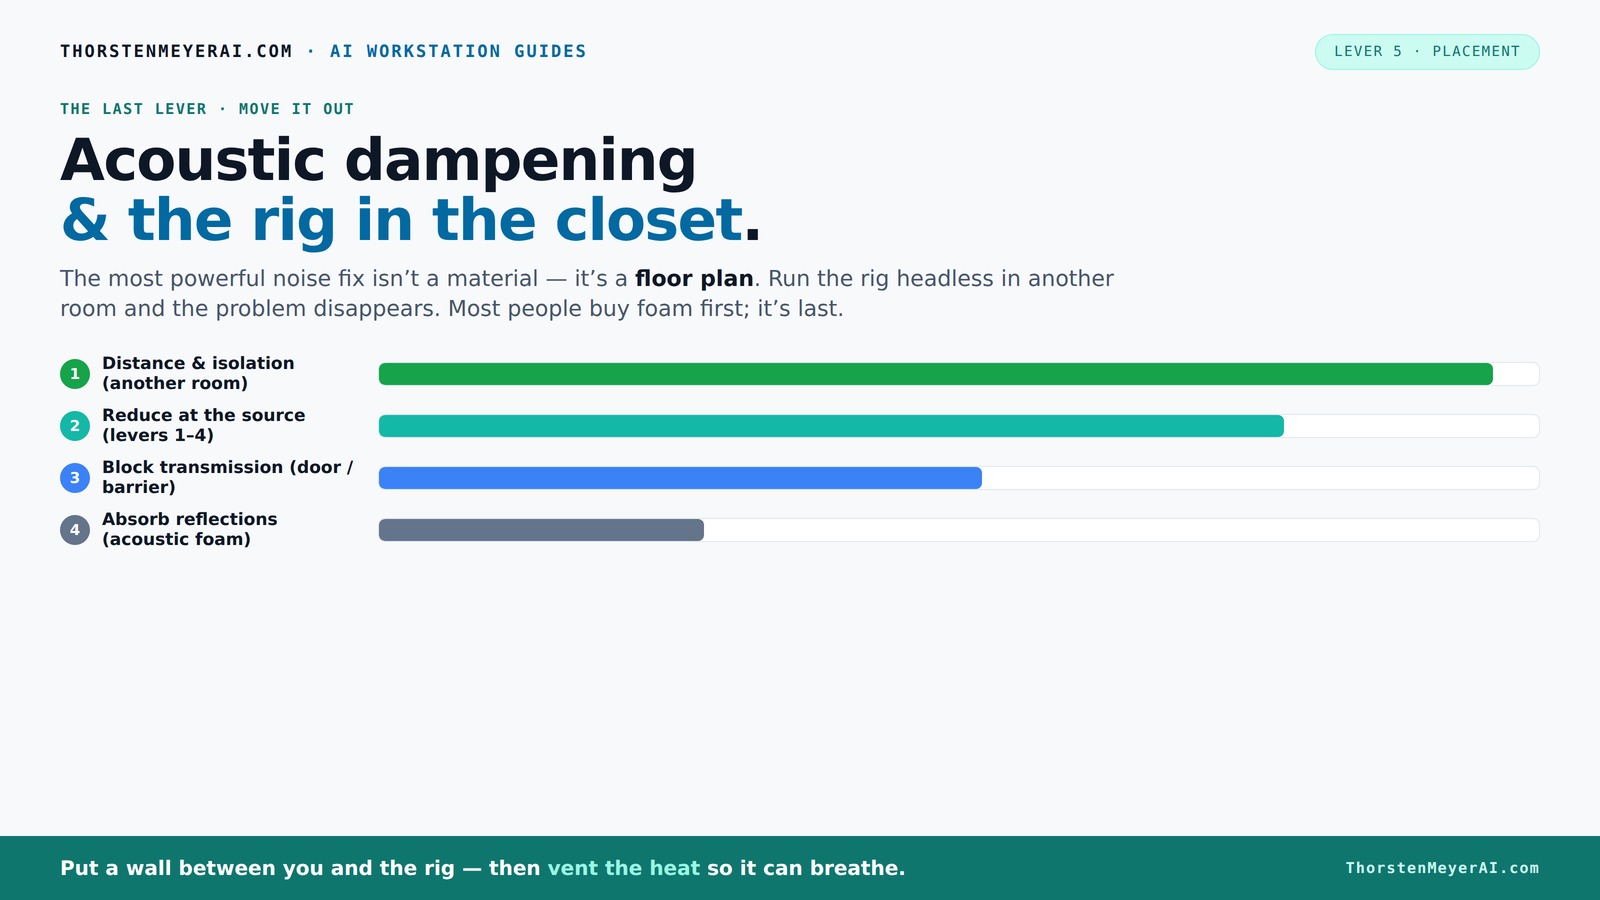
& the rig in the closet.
The most powerful noise fix isn’t a material — it’s a floor plan. A rig you can’t hear because it’s in another room beats any amount of foam. Tap the approaches in Part 1 to see what actually works.
(another room)
(levers 1–4)
(door / barrier)
(acoustic foam)
Contain the noise, not the heat
Key Takeaways
- Moving your rig into another room drastically reduces noise; don’t ignore network and ventilation needs.
- Acoustic dampening inside the closet helps with reflections, but sealing gaps and leaks is key for true soundproofing.
- Thicker panels and bass traps target low-frequency issues common in small spaces like closets.
- Proper placement of the mic—away from reflective surfaces and angled correctly—improves sound quality.
- Ventilation is essential; a quiet exhaust fan with thermostat control keeps your gear cool and prevents noise spikes.

BXI Sound Absorber - 16 X 12 X 0.4 Inches 6 Pack High Density Acoustic Absorption Panel, Sound Absorbing Panels Reduce Echo Reverb, Tackable Acoustic Panels for Wall and Ceiling Acoustic Treatment
- High Density Material: 200kg/m3 polyester fiber
- Optimal Dimensions: 16 x 12 x 0.4 inches
- Coverage Area: 7.7 square feet per pack
As an affiliate, we earn on qualifying purchases.
As an affiliate, we earn on qualifying purchases.
Acoustic Dampening vs. Soundproofing — What’s the real difference?
Acoustic dampening is about reducing echo and reflections inside a space, making it sound less 'boxy.' Soundproofing, on the other hand, stops sound from leaking in or out. Think of dampening as softening a room’s echo, while soundproofing is about creating a barrier that blocks noise transmission.
For a closet rig, most DIY setups focus on dampening — putting foam panels on walls and ceiling to stop reflections. But if you want to prevent your noise from bothering neighbors or others in the house, you need to seal gaps, doors, and vents for true soundproofing. A common mistake? People buy foam thinking it blocks sound — it doesn't. Foam alone just makes the space less echoey, not quieter from the outside.
Understanding this distinction is crucial because it influences your approach. Dampening improves the quality of your recordings by reducing internal echoes, which can make your voice sound clearer and more professional. Soundproofing, however, requires more effort and materials—like sealing gaps or adding mass—to prevent sound from escaping or entering. The tradeoff is that true soundproofing can be more complex and costly, but even basic dampening combined with sealing gaps can significantly improve your environment.
According to soundproofing experts, a combination of dampening inside and sealing gaps or adding barriers on the outside yields the best results, especially in small spaces like closets where reflections are intense and noise leakage can be a concern.
Step-by-step: Building your closet’s perfect acoustic layout
If you want your closet to sound great and stay cool, follow this simple plan:
- Identify your primary reflection points — usually the wall behind your mic and the ceiling.
- Place thick absorption panels (2-4 inches thick) on those key surfaces, especially on the wall behind your mic and the ceiling.
- Add bass traps in the upper corners to tame low-frequency buildup.
- Seal gaps around the door with weatherstripping or acoustic sealant to prevent sound leaks.
- Put a rug or carpet on the floor to absorb footstep noise and reflections.
This layered approach targets echoes, low-end issues, and leaks, creating a balanced, controlled environment. It’s important to understand that each layer addresses different acoustic challenges. For example, foam panels reduce high-frequency reflections but are less effective against low frequencies, which is why bass traps are essential. Sealing gaps prevents sound from leaking out, which is particularly important if you’re recording in an apartment or shared space. Learn more about acoustic dampening and placement techniques. The combination of these steps results in a more accurate and controlled sound environment, making your recordings clearer and your workspace quieter.
Where should you place your mic for the best sound and minimal reflections?
Your mic’s position determines how much sound bounces around and creates unwanted reflections. The best spot? About 6-12 inches away from a foam-covered wall, angled slightly to avoid direct reflections into the mic capsule. Keep it away from reflective surfaces like the desk or closet door.
Imagine a corner — placing your mic a foot from the wall and pointing slightly inward minimizes early reflections. Using a small desk or stand that isolates the mic from the closet’s surfaces helps, too. Remember, the closer you are to absorbent material, the less echo you'll get.
Pro tip: Use a reflection filter behind the mic if possible, and test with a portable recorder or your DAW’s meter to find the sweet spot. Proper placement reduces the amount of reflected sound reaching the mic, which directly impacts the clarity and presence of your recordings. For more tips, visit The Sound of Music Guide. It also minimizes the need for excessive acoustic treatment, saving you money and space. The key is to balance proximity with positioning to avoid proximity effect or muffled sound, and to ensure the mic captures your voice cleanly without picking up too much room noise or reflections.
Which materials give you the best bang for your buck?
Thick acoustic foam panels (2-4 inches) are great for mid and high frequencies. For low-end issues, bass traps in the upper corners are essential. Budget options like moving blankets or thick curtains can also dampen reflections if you're tight on cash.
For DIY projects, thick mineral wool, Owens Corning 703, or similar panels are popular because they absorb sound effectively without costing a fortune. Use a mix of foam panels and bass traps for a balanced setup.
Want a quick fix? Cover the closet walls with blankets or install DIY panels using egg-crate foam or thick upholstery fabric. Just remember: thicker panels absorb lower frequencies better, so aim for at least 2 inches of material. The choice of materials impacts your room’s frequency response: thicker, denser materials are better at controlling low frequencies, which are often problematic in small, enclosed spaces like closets. Combining different types of treatment ensures a fuller, more accurate sound profile, reducing muddiness and boominess that can plague small rooms.
How to seal gaps, doors, and vents to stop sound leaks
Sound leaks happen through cracks, gaps, and unsealed doors. The first step? Inspect your closet door and seal the edges with weatherstripping or acoustic door seals. For outlets or vents, add acoustic sealant or foam gaskets to block noise paths.
For an effective seal, consider installing a door sweep at the bottom and sealing around hinges and handles. Even tiny cracks can leak a surprising amount of sound, defeating your efforts.
In a pinch? Thick blankets or acoustic curtains around the door can help, but for best results, airtight seals matter most. Sealing gaps is often overlooked but is one of the most cost-effective ways to improve sound isolation. Small cracks around hinges, the gap under the door, or even poorly sealed vents can significantly compromise your efforts. Using high-quality weatherstripping and acoustic sealant ensures a tight fit, which is crucial because even minor leaks can allow enough sound to escape or enter, reducing the effectiveness of your treatment. Remember, the goal is to create an airtight environment—every crack sealed adds up to a quieter, more controlled space.
How to keep your rig cool in a sealed closet without noise spikes
Putting a computer in a closet traps heat unless you provide proper airflow. The best solution? Install a quiet exhaust fan with a thermostat. The fan pulls hot air out, keeping your rig cool and stable.
Passive vents help, but active ventilation is more reliable, especially if your rig draws 600W+ of power. You can also use ducting to route hot air outside or into an attic.
For a DIY closet booth, consider a soundproofed vent or a small, quiet AIO liquid cooler that moves heat out efficiently. Regularly monitor the temperature — if it climbs too high, your rig's fans will spin faster, creating more noise. Overheating can cause your computer to throttle performance or even shut down unexpectedly, which defeats the purpose of a quiet environment. Therefore, investing in an effective ventilation system is essential. The tradeoff is between noise from fans and heat buildup—finding the right balance ensures your system remains cool without generating distracting noise. Proper ventilation also prevents humidity buildup, which can lead to mold or corrosion, especially in enclosed spaces like closets.
Frequently Asked Questions
Can I turn any closet into a vocal booth?
Most closets can be transformed with acoustic dampening, sealing gaps, and ventilation. Small spaces benefit most, but you’ll need to address low-frequency buildup and airflow to make it truly effective.Where should I place my mic in a closet booth?
Position your mic about 6-12 inches from an absorbent wall, angled slightly to avoid reflections. Keep it away from the door and reflective surfaces like the closet walls or shelves.How much treatment do I need for a small closet?
Start with thick panels on the wall behind your mic, add bass traps in the corners, and seal gaps around the door. Over-treating can cause boxiness, so test and adjust as you go.Do foam panels really work in a closet?
Yes, foam panels absorb mid and high frequencies, reducing echo and reflections. But for low-end control, thicker panels or bass traps are necessary.How do I prevent my closet from overheating?
Use a quiet exhaust fan with a thermostat, install passive vents, or route heat outside with ducting. Regularly monitor temperature to prevent thermal throttling or gear damage.Conclusion
Transforming a closet into a quiet, functional workspace hinges on understanding the difference between dampening and soundproofing. Moving your rig into another room is the most effective step—everything else is layering. With smart placement, sealing leaks, and proper ventilation, you turn a cramped closet into a professional-grade environment.
Remember, the goal isn’t just silence — it’s a balanced, cool, and acoustically controlled space. Your closet can become your secret weapon for high-quality recordings and a peaceful work zone. So, next time you think about noise, think about the power of location and smart treatment first.