
This guide shows you how to make four spooky Halloween costume accessories from scratch: a battered witch or wizard hat, glowing creep-eyes for props or masks, realistic fake wounds, and skeleton-hand gloves. Each accessory costs only a few dollars in materials and requires no sewing machine or specialty equipment — just a hot glue gun, craft foam, and basic household supplies.

Get art and craft supplies delivered free with Prime
- Fast, free delivery on millions of items
- Prime Video, Amazon Music and more included
- Member-only deals all year
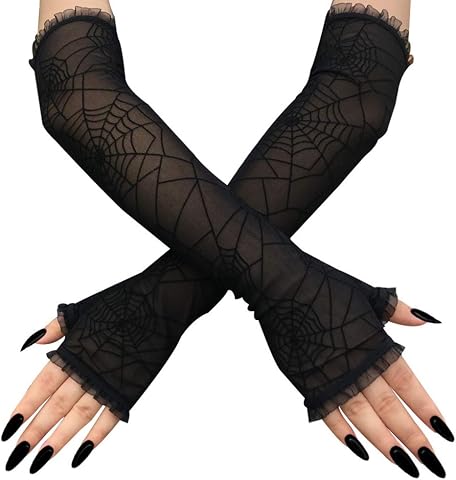
Women’s Spider Web Arm Warmers and Headband
- ✔ Fabric: Nylon and spandex
- ✔ Fabric type: Stretch fabric
- ✔ Size: One size

Set of 3 Black Spider, Spiderweb, and Skeleton Hand Hair Claw Clips
- ✔ Quantity: 3 clips
- ✔ Material: Alloy
- ✔ Color: Black gunmetal

Punk Halloween Skull and Skeleton Dangle Earrings
- ✔ Material: Acrylic
- ✔ Metal type: Stainless steel
- ✔ Back finding: Lever back
By the end, you will have a coordinated set of accessories that transform a plain outfit into a complete costume. This guide is written for beginners with no prior crafting experience; every step includes exact measurements and visual checkpoints so you can confirm progress as you go. Budget roughly one hour per accessory, plus overnight drying time for paint and liquid latex.
Work through all four accessories or pick the ones that fit your costume. The accessories are listed in order from easiest to most detailed, so beginners should start at the top.
Difficulty: Beginner | Time: 2-4 hours total (split across two sessions to allow drying time)
What You’ll Need
Tools & Materials:
- Hot glue gun and glue sticks
- Scissors and a craft knife
- Paintbrushes (one fine-tip, one wide)
- Black, grey, and red acrylic paint
- White chalk or white colored pencil
- Measuring tape or ruler
- Toothpicks for detail painting
- Battery-powered LED tea lights (2-3)
- Old newspaper or cardboard to protect your work surface
Knowledge:
- None required — all techniques are explained step by step
- Basic comfort using a hot glue gun safely (adult supervision for craft knife and hot glue if a child is making these)
Gather all materials before starting. Lay out newspaper over your work surface because acrylic paint and hot glue will not wash out of tables or clothing. If you are making the fake wounds with liquid latex, do a patch test on your inner arm 24 hours beforehand — some people react to latex. A gelatin-free scar alternative is included in Step 3 for anyone with a latex allergy.
Women’s Spider Web Arm Warmers and Headband
When we evaluate Halloween accessories, we ask whether they change the silhouette of a costume or merely trim it. This set does the former. The spider web arm warmers extend a witch, vampire, or gothic doll costume visually from wrist to elbow, and the matching headband ties the look together without requiring a wig or full hat. Compared with the claw clips, which modify a hairstyle, this set modifies the whole outfit—which is why it earns our top spot.The nylon-spandex stretch fabric is the practical advantage here: it slips over sleeves without pinching and moves with your arms during a party. That said, the one-size cut is the set’s real gamble. Buyers with larger arms or larger heads may find the headband snug, while smaller frames may see the warmers slide down by the end of the night. We also flagged the inconsistent care instructions—hand wash and machine wash are both listed, and stretch nylon generally fares better with hand washing.
Pros:
- Two coordinated pieces that visibly transform a whole costume
- Stretch nylon-spandex fabric moves comfortably with your arms
- Spider web print works with witch, vampire, goth, and punk themes
- No fasteners or hardware to break mid-party
Cons:
- One-size design may not fit larger or smaller frames well
- Care instructions are contradictory between hand wash and machine wash
- Distinctly costume-oriented, limiting off-season wear
Best for: Costume wearers who want a bold, coordinated spooky look that transforms a simple black outfit into a full Halloween costume.
Not ideal for: Anyone who needs guaranteed sizing or wants an accessory they can wear outside of costume season.
Bottom line: If you want the single purchase with the biggest spooky visual payoff, this coordinated set is the one to buy.
“If you want the single purchase with the biggest spooky visual payoff, this coordinated set is the one to buy.”
Set of 3 Black Spider, Spiderweb, and Skeleton Hand Hair Claw Clips
Measured purely on accessories per purchase, nothing else in this lineup competes: three distinct designs—a spider, a web, and a skeleton hand—for less than a single costume piece usually costs. Where the arm warmer set makes one strong statement, this set lets you rotate three different spooky looks across multiple parties, or split them among family members. That flexibility is why we rank it as the best value.The alloy construction and gunmetal black finish feel more considered than painted plastic clips, which tend to chip after one night. These are built to be removed and reused, and they’re light enough that a half-up style won’t sag. The honest weakness is thematic: unlike the skull earrings, which pass as everyday punk jewelry, these clips read unmistakably as Halloween or alternative-fashion pieces. We’d also caution that no clip dimensions are listed, so buyers with very thick buns should verify capacity before ordering.
Pros:
- Three distinctive designs in one affordable set
- Works with buns, updos, and half-up styles on thick or thin hair
- Alloy build with reusable, resellable durability
- Lightweight enough to avoid pulling on styles
Cons:
- Boldly themed, so limited use outside Halloween or alt-fashion wardrobes
- No clip dimensions provided, making capacity a guess
- Gunmetal finish may show wear over repeated seasons
Best for: Buyers attending multiple Halloween events—or styling several people—who want variety and reusability on a budget.
Not ideal for: Anyone wanting a subtle accessory or those with very thick hair who need guaranteed clip capacity.
Bottom line: The most cost-effective way to accessorize multiple spooky looks, provided bold Halloween styling is what you’re after.
“The most cost-effective way to accessorize multiple spooky looks, provided bold Halloween styling is what you’re after.”
Punk Halloween Skull and Skeleton Dangle Earrings
The earrings take the opposite approach from our other picks: instead of committing fully to Halloween, they straddle costume and everyday wear. Skull motifs are a staple of punk and gothic fashion, which means these drop earrings look intentional with a leather jacket in March, not just a witch costume in October. If your goal is spooky flair you’ll actually reuse, this pick makes the most sense.Comfort is the standout practical feature. The lightweight acrylic construction means long dangles that don’t drag your lobes down by the end of a party—something metal-only skull earrings frequently get wrong. The lever back closure is also more secure than French hooks, so you’re less likely to lose one in a crowd. The tradeoff is authenticity of heft: acrylic skulls lack the weight and finish of solid alloy, and we noticed the listing itself is inconsistent about materials, citing both acrylic and alloy. Compared with the claw clips, which are more visually dominant, these are an accent—buy them to finish a look, not to carry one.
Pros:
- Lightweight acrylic keeps dangle styles comfortable all night
- Lever back closure stays secure through parties and crowds
- Multi-style skull designs suit Halloween, cosplay, and everyday punk looks
- Comes across as a genuine festival gift option
Cons:
- Skull theme doesn’t suit formal or conservative occasions
- Listing inconsistently describes materials as both acrylic and alloy
- Subtle accent scale—won’t anchor a full costume on its own
Best for: Buyers who love gothic aesthetics year-round and want a spooky accent that works for parties, cosplay, and daily outfits.
Not ideal for: Costume wearers seeking a bold centerpiece accessory, or anyone sensitive to mixed-material inconsistencies.
Bottom line: The best pick if you want spooky style that survives past Halloween night without looking like leftover costume gear.
“The best pick if you want spooky style that survives past Halloween night without looking like leftover costume gear.”
As an Amazon Associate we earn from qualifying purchases.
Before You Start
Three things to sort out before you begin:
- Check your glue gun temperature. High-temp guns burn skin instantly and warp craft foam. Use a low-temperature gun if you have one, especially for the foam hat brim.
- Set up a drying station. You need a flat, out-of-the-way spot where accessories can sit undisturbed overnight. A shelf or the top of the refrigerator works well.
- Plan your costume color scheme. Decide now whether your accessories will be grey-green (classic witch), bone-white (skeleton), or red-and-black (bloody ghoul). Buying paint in one consistent palette saves money and makes the set look coordinated rather than random.
Adults should handle the craft knife steps entirely, and hot glue steps for children under 12.
Step-by-Step Instructions
Step 1: Build the battered witch or wizard hat frame
Roll one sheet of black craft foam into a cone shape roughly 14 inches tall with a base opening about 7 inches across. Hold the cone at that size, then run a line of hot glue along the overlapping edge from base to tip. Press the seam closed and hold it for 30 seconds until the glue sets. Trim the uneven bottom edge of the cone flat with scissors so it stands level.
Cut a circle 16 inches in diameter from the second foam sheet for the brim. Place the cone upside down in the center of the circle and trace around its base with chalk. Cut out that inner circle, cutting about a quarter inch inside your chalk line so the brim fits snugly. Slide the brim up the cone to sit 2 inches from the bottom, then glue it in place with a thin bead of glue around the seam.
Tip:If the brim keeps sliding, hold it in place with clothespins for five minutes while the glue fully hardens. Do not rush this — a loose brim is the most common point of failure for foam hats.
Check: The hat holds its shape when you set it on a table and lift it by the tip. The brim does not wobble or slide.
Step 2: Age and distress the hat for a worn, sinister look
Squeeze a small puddle of grey acrylic paint onto a paper plate. Dip a dry brush, wipe most of the paint off on the plate edge, then drag the brush lightly across the hat in downward strokes. This dry-brush technique deposits paint only on the raised texture, creating the streaked look of old weathered fabric. Focus on the brim edge and the cone tip, where a real hat would wear out first.
Heat the low-temp glue gun and add intentional damage: drip small blobs of hot glue along the brim edge, then pinch and pull them slightly as they cool to create torn, melted-looking edges. Bend the cone tip crooked by warming the foam gently with a hairdryer for 20 seconds, bending the tip about 45 degrees, and holding it until it cools.
Tip:Keep the hairdryer moving. Holding it in one spot for more than 30 seconds will shrink or melt the foam.
Check: The hat looks faded and worn rather than brand new, with a visibly crooked tip and irregular brim edges.
Step 3: Create realistic fake wounds and scars
Squeeze a line of liquid latex about two inches long directly onto clean, bare skin where you want the scar. Let it dry for 60 seconds until it turns translucent. Apply a second layer over the first, and while it is still tacky, tear a small piece of facial tissue and press it into the latex to build lumpy texture. Add one more layer of latex on top. Wait about five minutes until it is fully dry, then paint the wound with red acrylic paint in the center, blending darker red and purple at the edges. Finish by cutting a thin slit through the center of the latex with a craft knife tip and pulling the edges slightly apart to reveal the ‘open’ wound.
Mix one tablespoon of clear eyelash glue with a drop of red food coloring to make the latex-free alternative. Paint it onto skin in a wound shape, let it become tacky, then press in tissue texture exactly as above. The result is less dramatic but safe for latex allergies.
Tip:Do a patch test first, and never apply liquid latex over hair, eyebrows, or near the eyes. Removal: peel the latex off slowly, then wash the area with soap and warm water.
Check: The wound looks raised and three-dimensional from three feet away, with visible color variation between the red center and darker edges.
Step 4: Make glowing creep-eyes for masks and props
Pull the flame-shaped plastic top off each of two battery-powered LED tea lights — it snaps off with a firm twist. Paint the outside of each bulb with two thin coats of red acrylic paint, letting each coat dry for ten minutes. The paint dims the light to an eerie deep red glow instead of a bright flame.
Position the painted lights eye-distance apart — roughly 2.5 to 3 inches between centers — inside a mask, a hood, or behind the eye holes of a prop skull. Angle them so they point slightly outward, mimicking natural eye direction. Test the switch position before gluing so you can still reach it, then hot-glue both lights in place.
Tip:Always use battery LED lights, never real candles, inside any costume piece. Fabric and foam catch fire quickly.
Check: In a dim room, the eyes glow red and are clearly visible from across the room, and you can reach the on/off switches.
Step 5: Paint skeleton bones onto gloves
Put on plain black stretch gloves — cotton or knit works best because paint sticks to it. Keep the gloves on your own hands while you paint so the fabric stays stretched; this prevents the bone designs from distorting when the gloves are worn later.
Thin your white acrylic paint by mixing in one drop of water. Paint the finger bones first: on each finger segment, paint one small elongated oval, working from knuckle to fingertip so you get three bone segments per finger. Paint the long metacarpal bones across the back of the hand next, as four fanning lines connecting to the wrist. Finish by adding small circles at every joint to suggest knuckle bones.
Tip:Paint with your hand flat on the table, fingers slightly spread. Keep a damp paper towel nearby to wipe off mistakes immediately — white paint on black is forgiving only before it dries.
Check: When you hold your hand flat, palm down, the back of the glove reads clearly as a skeleton hand with distinct finger bones and knuckle joints.
Step 6: Assemble, test, and weather the full set
Lay out all four accessories together with your planned costume. Check the color palette: if anything looks too bright or clean, apply another pass of grey dry-brushing to the hat and brush a light grey wash (grey paint heavily diluted with water) over the gloves to unify the set. Let everything dry overnight.
Run a full dress rehearsal in a dimly lit room: hat on, gloves on, wounds applied, eyes switched on. Test that you can move, hold a treat bag, and see properly. If the hat slips, add a strip of foam or a folded paper towel inside the band to tighten the fit.
Tip:The dress rehearsal matters more than people expect — accessories that look perfect on a table often block vision or fall off when worn. Fix issues now, not on Halloween night.
Check: You can walk around a dark room, pick up an object, and turn your head without anything shifting, blocking your vision, or falling off.
Common Mistakes to Avoid
- Gluing the hat brim on before testing the fit on your head. — Always test the cone on your head before cutting and attaching the brim. If the opening is too small, cut small slits up from the base edge to widen it.
- Using thick coats of paint on foam and fabric, which cracks and flakes off when flexed. — Apply multiple thin coats instead of one thick one. Thin coats flex with the material and dry faster.
- Applying liquid latex without a patch test or over hair. — Patch test 24 hours ahead on the inner arm, and apply a thin layer of petroleum jelly as a barrier on surrounding skin (never over hair or near eyes).
- Painting gloves while they are off your hands. — Wear the gloves while painting. The fabric stretches when worn, and designs painted flat will distort into uneven smears once the gloves are on.
- Blocking vision with accessories, especially the hat brim or mask eyes. — Do the dim-room dress rehearsal and check peripheral vision before finalizing anything. Trim the brim or enlarge mask eye holes if needed.
Troubleshooting
Problem: Hot glue is melting or warping the craft foam.
Solution: Switch to a low-temperature glue gun, or use fabric-tac craft glue instead and clamp with clothespins for 15 minutes while it cures.
Problem: The fake wound edges are lifting from the skin.
Solution: Dab a small amount of liquid latex onto the lifting edge with a cotton swab and hold it down for 30 seconds. Dust translucent setting powder over the blend line to secure it.
Problem: LED eyes are too dim after painting.
Solution: You applied the paint too thickly. Scrape some paint off with a toothpick or add a third of the bulb left unpainted facing forward to let more light through.
Problem: The hat cone collapses or flops sideways.
Solution: Cut a circle of lightweight cardboard slightly smaller than the brim and glue it inside the cone base as a stiffener. For a floppy tip, insert a wooden skewar along the seam inside the cone before regluing.
Problem: White paint on the gloves rubs off onto everything.
Solution: Once fully dry overnight, heat-set the paint with a hairdryer on medium for two minutes per glove, then spray lightly with clear acrylic sealer. Wash hands before wearing and avoid heavy rain.
What Success Looks Like
Your accessory set is complete when all of the following are true: the hat sits level on your head with a crooked, weathered tip and stays on when you turn your head quickly; the fake wound looks raised and colored from three feet away and survives an hour of wear without lifting; the LED eyes glow visibly red across a dim room and you can reach their switches; the skeleton gloves clearly read as bones when worn; and everything you made coordinates in one color palette. The final test is the dim-room dress rehearsal — if you can walk, see, and carry a treat bag with everything on, the set is done.
Next Steps
Store the hat and gloves in a cool, dry place inside a plastic bin to protect them from moisture — properly stored, they will last several Halloween seasons. Remove latex wounds after each use and discard them; they do not store well. Replace LED batteries before each use. If you enjoyed this build, level up next year with EVA foam armor pieces, a PVC-pipe scythe, or a full-face latex prosthetic. If a specific piece keeps failing after two repair attempts, replacement craft foam costs under a dollar — sometimes remaking a piece is faster than fixing it.
Frequently Asked Questions
How far in advance should I make these accessories?
Make them at least three days before Halloween. This gives you one full day of crafting plus overnight drying time, and a buffer day for repairs or a dress rehearsal fix. Accessories made the night before are the ones that fail.
Can I make these accessories with kids?
Yes, with role division. Kids can paint, chalk-trace, and apply tissue texture. Adults should handle the hot glue gun, craft knife, and hairdryer steps. The latex-free wound recipe using eyelash glue is the safest option for children.
What can I substitute for craft foam if I don’t have any?
Stiff black felt works for the hat, though it will be floppier — reinforce the brim with cardboard. An old black t-shirt or a cheap plain hat can also be aged and distressed using the same dry-brush technique instead of building one from scratch.
How do I keep the fake wounds on all night at a party?
Set them with translucent face powder after painting, and avoid touching or rubbing the area. Sweat is the main enemy — blot gently with a tissue rather than wiping. Carry a small tube of liquid latex for touch-ups if an edge lifts.
Are the LED lights safe to wear inside a hood or mask?
Battery-powered LED tea lights are safe — they produce almost no heat. Real candles are never safe in a costume. Just make sure the battery compartment is secured with hot glue or tape so it cannot fall open against your skin, and keep the switch accessible.
Halloween Picks
halloween
As an affiliate, we earn on qualifying purchases.